Can you believe this is our 100th post? We started this blog in 2010 as we purchased our first home. Our house and our family has certainly changed a lot in that time, just like any young family. We are so proud of the work that has gone into this house. It might not be perfect, but our blood, sweat, and tears make this little place home. After all, 'A' for effort is the motto around here!
We've completed a lot of projects to date including two bathroom renovations, a kitchen transformation, dining room makeover, new carpet, countless nursery and guest bedroom tweaks, and more. Pretty soon we're going to run out of projects on this house...
We couldn't do all of these crazy house projects without the support of our family. Your blood, sweat, and tears made this home possible! Thank you so much to the loyal readers of this blog. My co-workers, friends, and family put up with this nonsense (ha!).
With the 100th post, I've implemented a few exciting changes on our blog. First, I added Pinterest pins to every blog post so you can easily share our projects. Pin away! Second, I created several new pages accessible from the top navigational bar on our homepage. New pages include About Us, House Tour (in progress), and Post Archive.
I'm not sure what the future of this blog holds. We've had less time for home projects and less projects to complete. Despite our active family, we have completed a few projects lately
including a new sink faucet, dishwasher install, building shelving,
building a park bench and stand, and a landscaping retaining wall. I'll catch you up on those in the near future. For now, enjoy our new pages!
Monday, July 15, 2013
Friday, April 12, 2013
A Total Transformation
Finally our bathroom renovations come to an end. We actually finished this project around this time in 2012. We scurried to finish things as I was 7 months pregnant before our Memorial Day party. Thankfully, we met our deadline! Too bad I'm just now getting around to sharing this one year later...
Our ugly basket weave (see the top) medicine cabinet that was recessed into the wall. Above is my weak attempt at updating things with a light fixture shortly after we moved into our house.
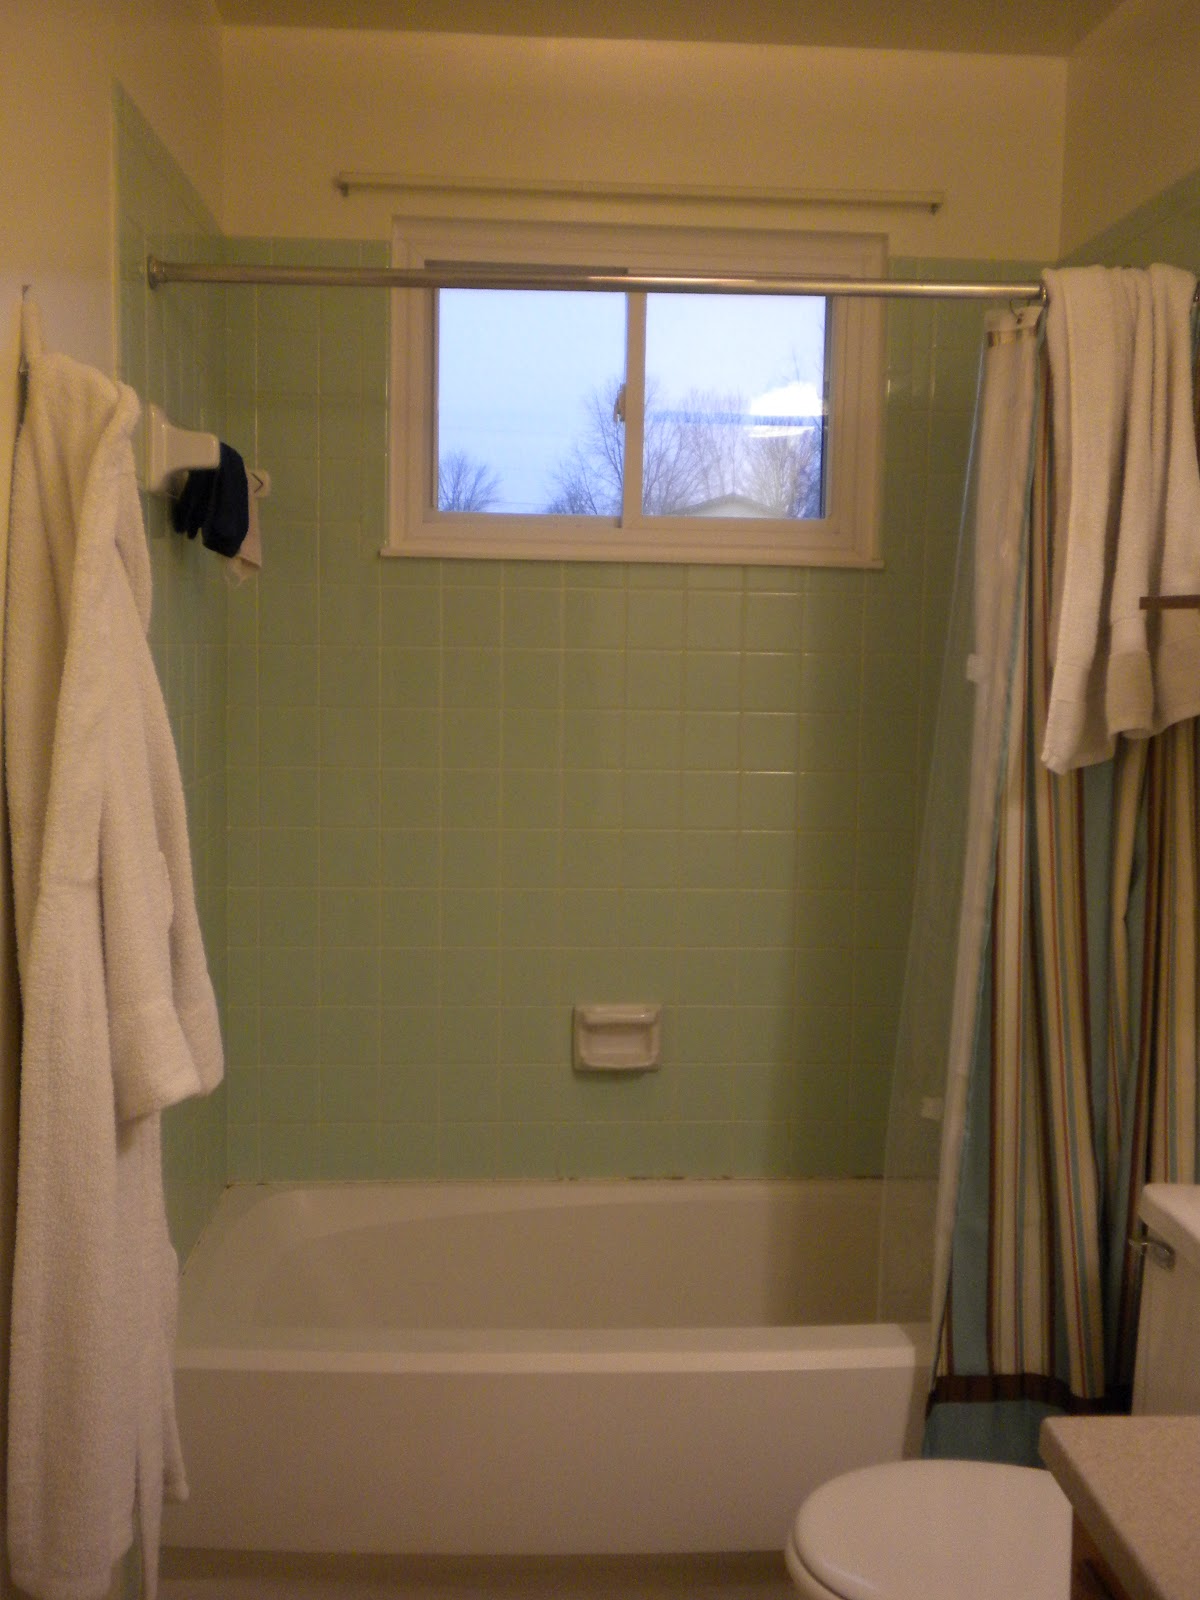
Linoleum that's cracked and peeling. Sad to see this floral pattern go... not.
We actually had blue rugs in our old bathroom. The vanity top was actually newish (it had been replaced by the previous owner). It was curb-cycled by the pickers on garbage day. Hopefully someone is now enjoying that newish vanity top in their home!


A new robe hook, for moi!

In hindsight, I may have installed a hook for hand towels too instead of a towel bar. It actually makes the bathroom look neat and tidy when the towels are on the hook. Instead, we sploppily hang our hand towels on the towel bar.

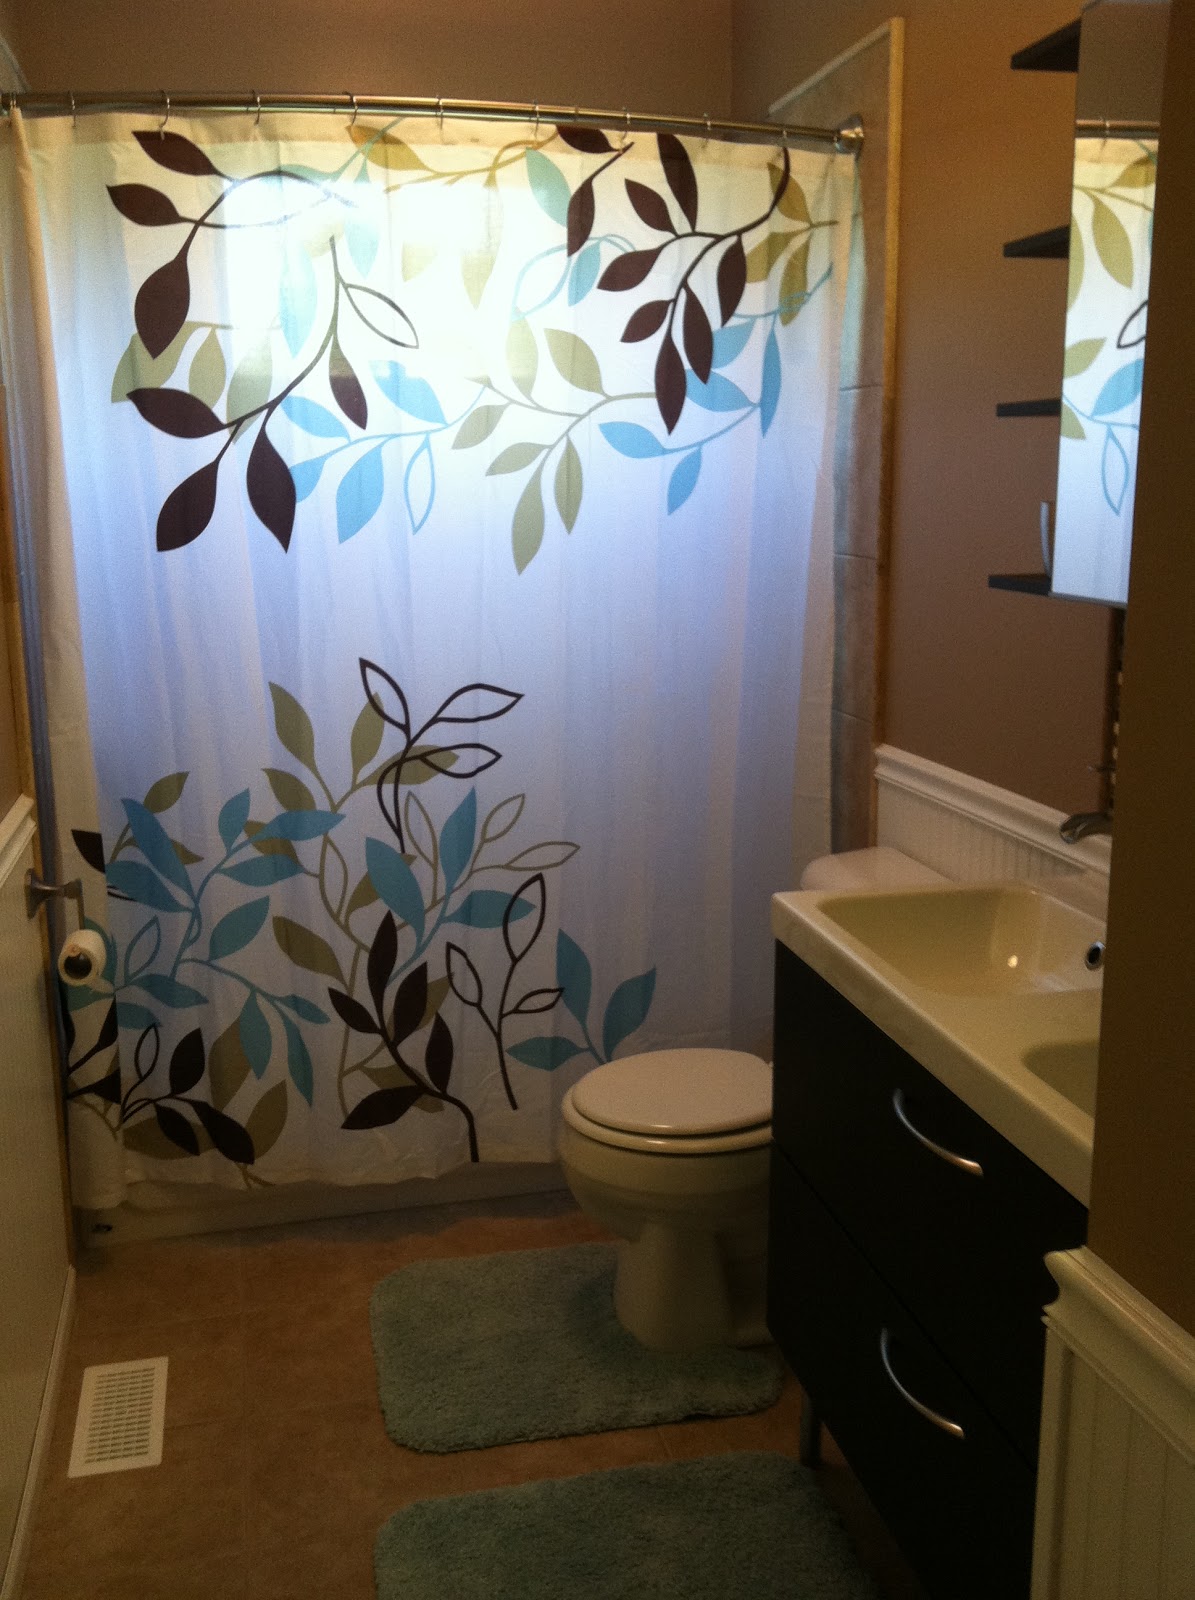
The placement of the toilet paper holder was much-debated. I think we made the right decision. We'll find out when little T starts potty training if he can actually reach it!
.JPG)
Check out that beautiful tile! the grout really blends in well. I love the natural stone look of this ceramic tile. Plus, our shiny new tub. I also believe our tub got curb-cycled. That was probably for scrap metal though.
.JPG)
The install of this Delta faucet replacement went much better than the first bathroom. I already knew what I was doing even though it's fairly complex (it had 3 different install options depending on the kind of faucet you were replacing, so I had to figure out which type we were). It's so shiny and clean.
.JPG)
.JPG)
Freshly painted closet doors equipped with brushed nickel hinges and handles. We also replaced the outlets, switches, and covers with white instead of cream.
.JPG)
.JPG)
I love this mosaic backsplash! It's just a little flash of interest behind the vanity. The pour style faucets have also been a huge hit among guests at our house. We purchased this foaming soap dispenser from Meijer. It was more costly than I prefer, but it really does look better than a plastic bottle.
.JPG)
The vanity is a few inches wider, but everything still fits! There's even enough room for a small trash can next to the toilet.
.JPG)
Sullivan is pretty happy with this renovation; he especially loves the plush new rugs.
WOW. Can you believe that? Our new bathroom looks fantastic. We put in a lot of hard work over 2 months. Nobody said DIY was fast! Big thanks to my mom, Steve, and Rex for all of their help. Also a huge thanks to Tim for doing most of the demo by himself and all of the painting! I am pretty proud of the work that I did in here despite the limitations of being 5-7 months pregnant during this renovation.
This is a total transformation. I can't think of much that I would have changed now that we've been living with it for a year. Maybe a hook for the hand towels instead of a towel bar, but that's pretty minimal. Even now, I still stare in awe at the gorgeous new look of this room.
Our DIY projects have slowed since Turner joined our family almost 9 months ago. We tackled most of the major projects before he was born (new flooring, kitchen, 2 bathrooms, etc.). Pretty soon, he'll be swinging a hammer too! We have managed to tackle a few projects that I'll be back to post!

BEFORE
 |
 |
 |
Aqua/lime sherbet colored tile is the best! I knew I wanted to rip this out the day we looked at the house. Nevertheless, I loved the home, neighborhood, location, and layout. We could overlook the lime-y bathroom. Now, the moment you've been waiting for (with bated breath I know)... the after photos.
AFTER

A new robe hook, for moi!

In hindsight, I may have installed a hook for hand towels too instead of a towel bar. It actually makes the bathroom look neat and tidy when the towels are on the hook. Instead, we sploppily hang our hand towels on the towel bar.

The placement of the toilet paper holder was much-debated. I think we made the right decision. We'll find out when little T starts potty training if he can actually reach it!
.JPG)
Check out that beautiful tile! the grout really blends in well. I love the natural stone look of this ceramic tile. Plus, our shiny new tub. I also believe our tub got curb-cycled. That was probably for scrap metal though.
.JPG)
The install of this Delta faucet replacement went much better than the first bathroom. I already knew what I was doing even though it's fairly complex (it had 3 different install options depending on the kind of faucet you were replacing, so I had to figure out which type we were). It's so shiny and clean.
.JPG)
Check out the wainscoting! Doesn't that look crisp and clean? I love how it brightens the bathroom.
.JPG)
Freshly painted closet doors equipped with brushed nickel hinges and handles. We also replaced the outlets, switches, and covers with white instead of cream.
.JPG)
I love having a two sink vanity. I worried that having less counter space would be a problem-- it hasn't been. It forces me to keep the bathroom tidy. Plus, I have two drawers to stash all of my junk. :)
.JPG)
I love this mosaic backsplash! It's just a little flash of interest behind the vanity. The pour style faucets have also been a huge hit among guests at our house. We purchased this foaming soap dispenser from Meijer. It was more costly than I prefer, but it really does look better than a plastic bottle.
.JPG)
The vanity is a few inches wider, but everything still fits! There's even enough room for a small trash can next to the toilet.
.JPG)
Sullivan is pretty happy with this renovation; he especially loves the plush new rugs.
|
| Before |
.JPG) |
| After |
 |
| Before |
 |
| After |
This is a total transformation. I can't think of much that I would have changed now that we've been living with it for a year. Maybe a hook for the hand towels instead of a towel bar, but that's pretty minimal. Even now, I still stare in awe at the gorgeous new look of this room.
Our DIY projects have slowed since Turner joined our family almost 9 months ago. We tackled most of the major projects before he was born (new flooring, kitchen, 2 bathrooms, etc.). Pretty soon, he'll be swinging a hammer too! We have managed to tackle a few projects that I'll be back to post!

Thursday, March 14, 2013
More Tiling?!
I talked a little bit about our trim tile in this post. Unfortunately, we did a terrible job of photographing this portion of the project. We wanted the edges of the shower and tile backsplash (more to come on that in a minute) to look finished, so we opted for a rounded trim tile.
It was a little (ok a lot...) pricey. We used the caulk-like product described in my first post to adhere the trim tile. We cut pieces with a tile saw as necessary (there was only 1 cut in the tub surround!). We used painters tape to hold the tile in place above the window, since there wasn't tile below to support the weight of the trim tile.
When it came to the tile backsplash, we decided to use the same trim tile. We defined the edges of the backsplash first so that we knew where to install the backsplash tile. We 'glued' our trim tile using the caulk-like product. We did have to make a couple of cuts here. We used the boundaries of the vanity as the edges for the backsplash too. That did leave a tiny gap between the wall and the backsplash on the right, but I actually think it looks better that way. You can see the full effect when you view the photos at the end of this post. At first we were a little skeptical, but it looked weird pushed all of the way up against the wall.
When Tim and I went to look at tile for the bathroom, I saw this beautiful glass mosaic tile. It was way too expensive to put in the tub surround. We could have opted for an accent tile in the tub surround, but I liked the neutral look of the tile we chose.

We had this gorgeous vanity, pour style faucets, and blank space behind the vanity. Yes, we could have painted it the wall color, but that felt boring. When I spotted this glass mosaic tile, I knew I wanted to use it in the bathroom, so the backsplash was the perfect location.
.JPG)
For our kitchen backsplash, we used pre-mixed grout like this:
to adhere the tile to the wall. Yes, this was cheating, but who doesn't love a short cut? The tile just needed to adhere to the wall.
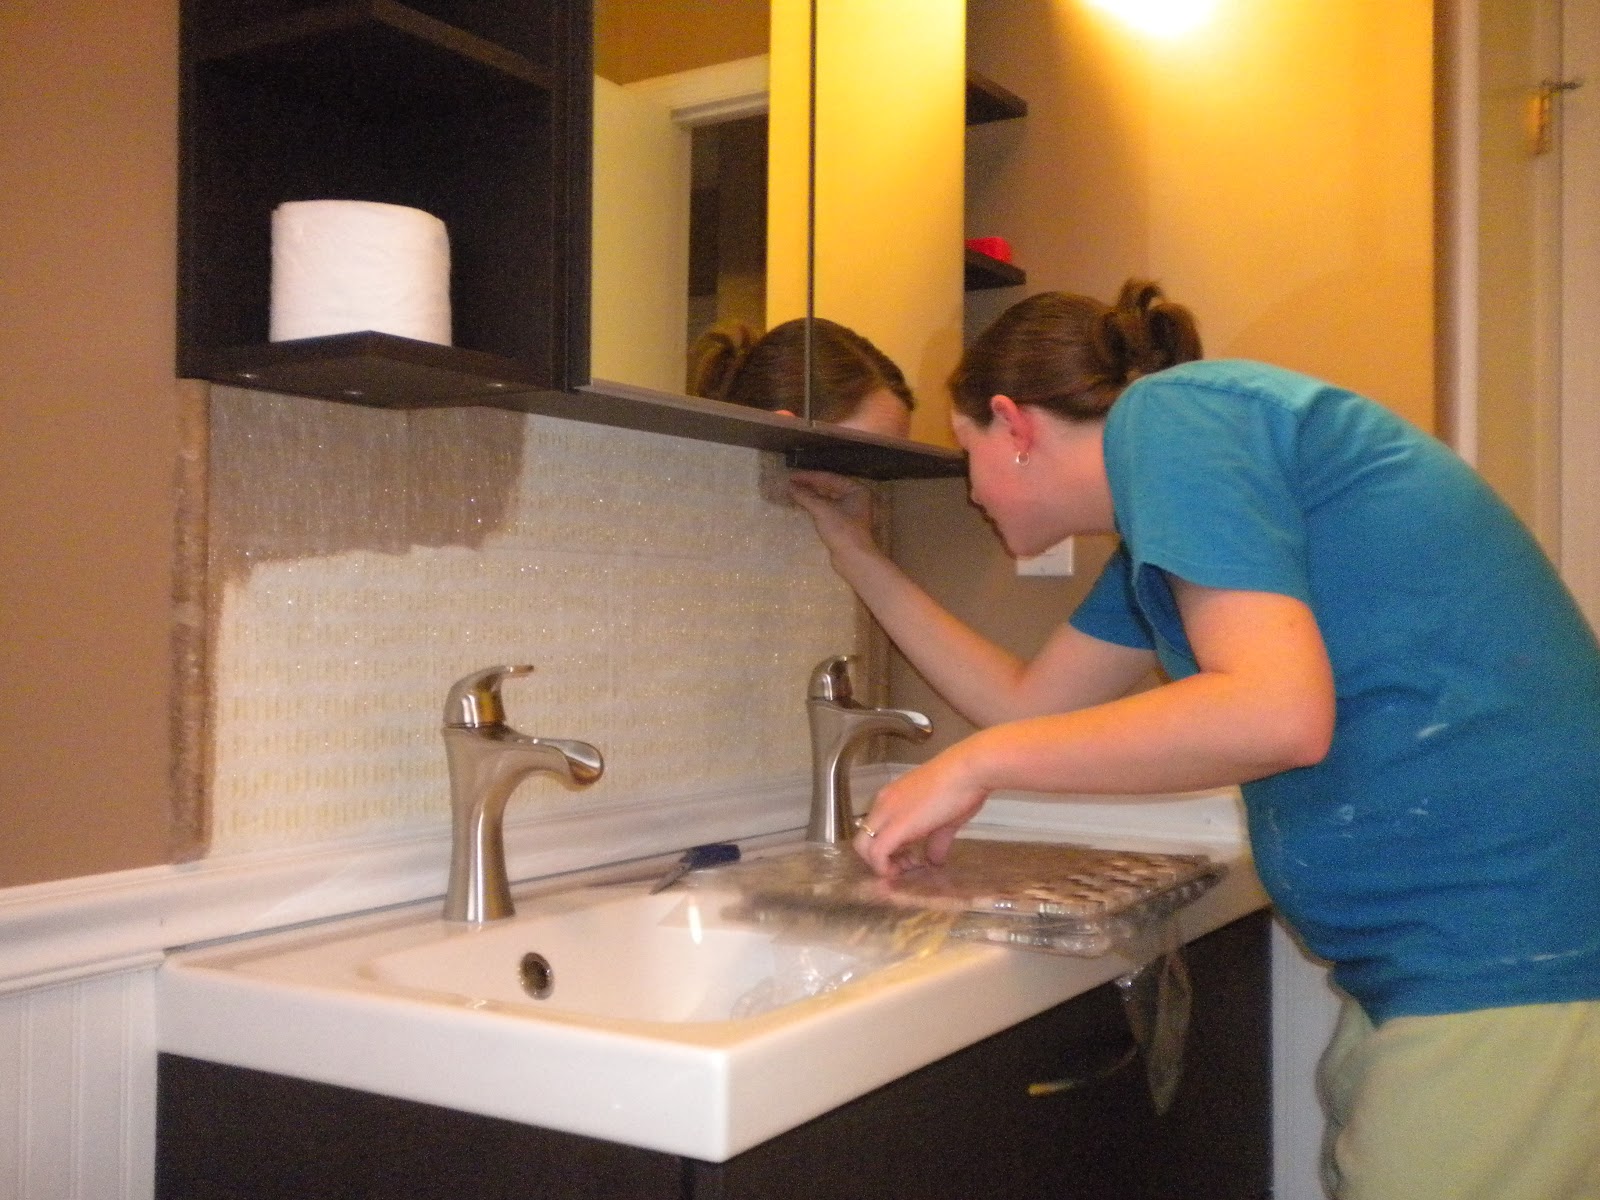
The shortcuts get even better... My mom told me about a new product called SimpleMat Tile Setting Mat. This product is so easy! I seriously think my youngest niece could have installed it. In fact, here I am 7 months pregnant installing tile backsplash before our Memorial Day visitors.

SimpleMat Tile Setting Mat is basically double sided tape used to adhere tile to your surface. My mom used the tile setting mat when she added granite tile to her kitchen countertop and it worked great, so I knew it was a good product. Plus, it's from the same manufacturer of our preferred pre-mixed grout. You can use it for countertops, backsplashes, and even shower walls. We used regular mix-it-yourself grout for the shower walls. It would have cost us close to $150 to purchase enough tile setting mat to do the whole shower area. Let's face it, we are frugal, so we went with regular grout for about $30 total.
For the backsplash, however, we didn't want to get out the bag of grout and mix again. Plus grout is messy and it would have been all over our sink, faucets, etc. I purchased one box for this project and it cost me about $20 (one box is 10 sq. ft. of coverage, so we even have leftover). It's very simple to use. You take a sheet of SimpleMat and cut it to size with regular scissors to match the area you want to tile. Then, you peel off the backing and stick it to the wall (you can see me doing this in the above photo). After you've covered your surface area with SimpleMat, you peel off the front backing (that doesn't sound right-- the paper that sticks to it so that it's not all sticky). So SimpleMat is now stuck to your wall and the front of it is sticky.
.JPG)
We didn't want to screw up the mixing of the grout which is part of the reason why we opt for pre-mixed. It can be difficult to get the same shade if you're using powdered dyes too. This is easy and it's already done for you (plus it only costs about $25 a tub and we used less than 1 tub for each project so far). We have used the same color of sanded grout from SimpleGrout in all of our projects (downstairs bathroom floor, upstairs bathroom floor and shower, kitchen backsplash, and now this backsplash). If we ever needed to touch up the grout for some reason, it's easy to know what we've used since it's the same product throughout.
.JPG)
You apply the grout with a float like this:
You smoosh the grout into all of the spaces between the teeny-tiny tiles. Then, you wipe off the excess and clean the surface of the tiles with a wet sponge. I do not recommend doing this in your bathroom sink because the sanded grout will gunk up your sink. Instead, use a bucket with water and dump the dirty water in your utility sink. Here's the finished product:


Isn't it gorgeous? Don't mind the stuff on the shelves. This bathroom hasn't been styled yet. :) I love a glass mosaic tile backsplash. It's in two rooms of my house now. After seeing this beauty, we seriously considered adding one in the downstairs bathroom. That decision is still pending. I think we couldn't decide what kind of tile to put in there, so we did nothing for now.
Sit tight. We're almost done with this bathroom renovation. I'll be back for before and after shots!
 |
| Unfinished |
 |
| Finished! |
When it came to the tile backsplash, we decided to use the same trim tile. We defined the edges of the backsplash first so that we knew where to install the backsplash tile. We 'glued' our trim tile using the caulk-like product. We did have to make a couple of cuts here. We used the boundaries of the vanity as the edges for the backsplash too. That did leave a tiny gap between the wall and the backsplash on the right, but I actually think it looks better that way. You can see the full effect when you view the photos at the end of this post. At first we were a little skeptical, but it looked weird pushed all of the way up against the wall.
When Tim and I went to look at tile for the bathroom, I saw this beautiful glass mosaic tile. It was way too expensive to put in the tub surround. We could have opted for an accent tile in the tub surround, but I liked the neutral look of the tile we chose.

We had this gorgeous vanity, pour style faucets, and blank space behind the vanity. Yes, we could have painted it the wall color, but that felt boring. When I spotted this glass mosaic tile, I knew I wanted to use it in the bathroom, so the backsplash was the perfect location.
.JPG)
For our kitchen backsplash, we used pre-mixed grout like this:
to adhere the tile to the wall. Yes, this was cheating, but who doesn't love a short cut? The tile just needed to adhere to the wall.
The shortcuts get even better... My mom told me about a new product called SimpleMat Tile Setting Mat. This product is so easy! I seriously think my youngest niece could have installed it. In fact, here I am 7 months pregnant installing tile backsplash before our Memorial Day visitors.
SimpleMat Tile Setting Mat is basically double sided tape used to adhere tile to your surface. My mom used the tile setting mat when she added granite tile to her kitchen countertop and it worked great, so I knew it was a good product. Plus, it's from the same manufacturer of our preferred pre-mixed grout. You can use it for countertops, backsplashes, and even shower walls. We used regular mix-it-yourself grout for the shower walls. It would have cost us close to $150 to purchase enough tile setting mat to do the whole shower area. Let's face it, we are frugal, so we went with regular grout for about $30 total.
For the backsplash, however, we didn't want to get out the bag of grout and mix again. Plus grout is messy and it would have been all over our sink, faucets, etc. I purchased one box for this project and it cost me about $20 (one box is 10 sq. ft. of coverage, so we even have leftover). It's very simple to use. You take a sheet of SimpleMat and cut it to size with regular scissors to match the area you want to tile. Then, you peel off the backing and stick it to the wall (you can see me doing this in the above photo). After you've covered your surface area with SimpleMat, you peel off the front backing (that doesn't sound right-- the paper that sticks to it so that it's not all sticky). So SimpleMat is now stuck to your wall and the front of it is sticky.
.JPG)
Our mosaic tile came on a mesh backing. It was a 12x12 mosaic sheet that you cut to fit. You just take regular scissors and cut the mesh backing to the size you want. Then, slap the tile on the wall! Or rather, carefully place the tile on the wall. You can see in the above photo that one sheet of tile didn't extend all of the way from the sink to the bottom of the medicine cabinet. I just cut pieces of tile off the mesh backing and added it.
Finally, you grout. Again, we used pre-mixed grout:
We didn't want to screw up the mixing of the grout which is part of the reason why we opt for pre-mixed. It can be difficult to get the same shade if you're using powdered dyes too. This is easy and it's already done for you (plus it only costs about $25 a tub and we used less than 1 tub for each project so far). We have used the same color of sanded grout from SimpleGrout in all of our projects (downstairs bathroom floor, upstairs bathroom floor and shower, kitchen backsplash, and now this backsplash). If we ever needed to touch up the grout for some reason, it's easy to know what we've used since it's the same product throughout.
.JPG)
You apply the grout with a float like this:


Isn't it gorgeous? Don't mind the stuff on the shelves. This bathroom hasn't been styled yet. :) I love a glass mosaic tile backsplash. It's in two rooms of my house now. After seeing this beauty, we seriously considered adding one in the downstairs bathroom. That decision is still pending. I think we couldn't decide what kind of tile to put in there, so we did nothing for now.
Sit tight. We're almost done with this bathroom renovation. I'll be back for before and after shots!

Thursday, February 28, 2013
Shiny and New
These beautiful fixtures... are shiny and new. I want to rub them like a genie lamp.

The tub fixtures were actually pretty easy. Our tub came with a regular stopper, but we purchased a toe-touch stopper instead. It was cheap and makes life easy, so why not? The wall was already prepped for fixtures with the cuts in the tile and pipes sticking out. Tim just had to screw these new fixtures in place and caulk around it.

Much like our downstairs bathroom, we purchased a Delta replacement kit for the hot/cold knob (does that have a name? On/off valve? I forget; you get the point). This was pretty easy for me to install since I've done it once before!
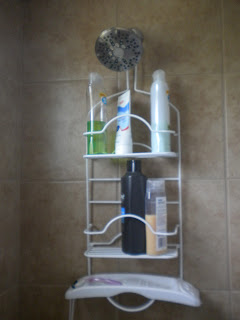
Ultimately, we opted for the hanging shower caddy. It just corrals everything so that you don't have products sitting on your bathroom ledge. The corner tension rods are bad too because they attract mold. If this gets rusty, we just recycle it and buy a new one.
This new shower head is very nice. I love it. In hindsight, we should have put in a longer arm for the shower head. This is the pipe that extends from the wall and it comes in varying lengths. This would have extended the water further from the wall. It's not overly problematic since we fit under it just fine, but it would be nicer to be a little further from the wall than we currently are. It's very easy to change, we just keep forgetting when we're at the home improvement store. We'll replace it with a longer one eventually.

Here's a close up shot of our finishes including toilet paper holder, wainscoting and chair rail, wall color, tile, and trim tile. A lot of details in one little snapshot! I love the way it turned out. The color choices are warm and earthy, yet bright and modern.

Sorry this picture is overexposed, but it does show you the toilet paper holder. We very seriously considered installing this on the side of the vanity so that it would be next to the toilet. I was thinking about the little arms that will be reaching for it in the future. It's a bit of a stretch for child-sized arms to reach across the bathroom for toilet paper. Ultimately, we opted for the wall for 3 reasons 1) those children will grow and have longer arms, so by the time they are 6-7 this won't be an issue anyway 2) it was a little too close to the toilet when it was on the side of the vanity 3) I was so worried that we would ruin our $500 vanity by drilling holes in the side.
We ended up drilling through the wainscoting to hang it. We felt like putting it above the wainscoting was just way too high. We put it snug against the tile because the towels (later in this post) would have obstructed the holder if we put it over further. Plus, it seems well placed now. We extended the shower tile by at least 6 inches when we retiled the bathroom, so there's never a worry that the toilet paper will get wet with the current placement (hasn't happened so far and we've been using this since May).

Of course we bought luxurious new hand towels. I didn't replace all of the shower towels because let's face it, I'm cheap! Do you know how much towels cost? We did replace the downstairs towels since they were exposed on our over the toilet organizer. I'm still recovering from that expense. haha!

Here's Tim hanging our towel hooks. It was really sad to drill into our pretty walls, but it was necessary and looked great when it was complete.

Initially, Tim purchased two of these. We thought that we might hand towels on one and my robe on the other. When we held both on the wall, it ate up too much space visually, so we opted for one. Instead, we just installed a removable 3M hook (like the one shown in the last photo) on the back of the bathroom door for my robe. These hooks do hold our shower towels though conveniently next to the shower, duh!
Sadly I don't have any pictures of Tim hanging the curved shower curtain. He had to drill into the tile to hang the curved rod. A straight rod could have been supported by tension, but when you go with the hotel style curved rod, you're faced with drilling into the wall or tile. I think we were both scared so we didn't take any pictures. He had to buy two diamond drill bits to finally make it through the tile. They were small holes but the ceramic tile is pretty mighty! Luckily it turned out great. The brackets for the rod cover the holes of course so you can't tell. We hung our shower curtain higher than normal too. The curved rod plus the extra height make for a very spacious shower. I don't think you realize it looking at the area until you're inside the shower. Then it feels pretty vast and open.

These are just 3M hooks that we hung in the shower. I couldn't stand the thought of drilling into the tile any more than we had to. We really needed a solution for bathing suits since we have a pool and always have wet suits lying around. We always hung them inside the shower before, but we had a towel bar there previously. Unfortunately, the steam caused the 3M hooks to fall. I did purchase suction hooks that worked okay though. If you have a better, non-drilling solution that doesn't involve suction hooks (I bought the power suction kind) or 3M hooks, please let me know.
%20on%20www.chanelleandtim.blogspot.com)
Friday, February 8, 2013
A Funcational Bathroom Round 2
My mom put wainscoting in her master bedroom. I really liked the look since it broke up some of the wall space, so I thought this would be a great option for our bathroom since we have one long wall with nothing on it. After we painted the top half of the bathroom, this seemed like an even better idea. The wall paint was darker than we expected, so the white wainscoting would help break things up.
.JPG)
Tim primed and painted all of the wainscoting and trim first.
.JPG)
Installation was pretty easy. We used an air compressor nail gun that Tim received as a Christmas present in 2011.
.JPG)
On the weekend that we began this project, we had a few helpers, Fergie (above) and Snoopy (below).
.JPG)
We had our usual helpers on hand to assist as well. Monkey and Fergie had to be in on the action.
.JPG)
Meanwhile, Sullivan was caught snoozing in bed.
.JPG)
They were all pretty paranoid of the loud noise made by the air compressor. They took to my side for protection.

I was actually able to help with this part of the project since it didn't involve any fumes or other hazardous activities.
.JPG)
But, I did leave the crawling around on the floor to Tim. At 6-7 months pregnant, lying on my belly to reach under the vanity wasn't really an option.

We had to install the vanity before we could install the wainscoting. This is because the top piece of trim extended behind the vanity. After much debate, we settled on this option since it would create a seamless look rather than abruptly stopping the top piece of trim.
You can also see our trim tile in this picture. We decided not to grout this because it would make a big huge mess. We thought we could use caulk instead. Tim headed to Home Depot to find something that would work. The Home Depot employee recommended this very thick caulk-like product. It was basically an all-purpose adhesive designed to be very strong (but it wasn't Gorilla Glue or anything like that). It worked perfectly! If I find the leftover, I'll let you know the name of the product.

After the vanity, came the wainscoting, then we were able to install the toilet. It's actually a pretty easy process. You place your wax seal then gently set the base of the toilet without jarring or moving the wax seal. This sounds easy, but it's pretty critical to a properly functioning toilet!
There are two bolts that hold the toilet in place. You set the bolts in the floor mount for the toilet. Then, you carefully place the toilet on the bolts while guiding the bolts into the holes on either side of the toilet. Sounds easy right? Not so. We tried several strategies with our first bathroom renovation. The bolts are pretty tall, but they wobbly when not secured by anything.
With our lower level bathroom, we tied strings to the bolts and strung them through the holes in the porcelain. I held the strings while Tim placed the toilet. That's a pretty tough challenge in a tight space. I read on another blog that you should use straws. Place the bolts in the floor mount, then put straws over the bolts, and guide the base of the toilet onto the straws. Lift the straws and voila your toilet is set.
The one additional piece of advice that I have-- you need to go grab yourself a couple of McDonald's straws for this task. Their straws are wide enough for the bolts to fit in. I had some skinny straws on hand that didn't work. Thankfully (?), Tim keeps a stash of miscellaneous items from drive thru meals such as straws, napkins, forks, etc. so he had a few to contribute to the cause.
After the base of the toilet is set, you can place the back, connect the plumbing, and you're done! Here's a good video on how to install a toilet in case you're curious.

So here's the one big wall of wainscoting. Ain't she pretty? Plus a crisp corner below. This picture captures a lot of the main items in the room.
.JPG)
We did some of the bathroom installation seemingly out of order. Thankfully, we were pretty logical and meticulous when we thought about what should come next so we didn't have to undo any of our work. Here's the rundown of events:
1) demo
2) tub
3) drywall
4) patch, spackle, sand everything
5) tile the tub surround and floor
6) paint the walls and trim
7) baseboard trim
8) vanity and sink, hook up the plumbing
9) trim tile (seems out of order, right?)
10) wainscoting and chair rail
11) toilet (again, out of order?)
12) medicine cabinet
13) tile some more (more tiling? why didn't we do it all at once?)
14) replace covers on the light fixture
15) replace door handles and hinges with brushed nickel
It was necessary to install the baseboard trim before the vanity because our vanity is raised on legs. You can see the space behind if you bend down. It was easier to put this in first. Tim then finished off the wainscoting by putting 6" tall pieces of wainscoting underneath. We're kind of perfectionists (or well, I am a perfectionist) and you could see from the side view (aka on the toilet or in the shower) that there wasn't wainscoting under the vanity if we skipped this step.
We tiled again (round 2) when we installed the trim tile. We wanted to paint the walls first, so that we didn't get paint on our new beautiful tile. Plus, it took us months to decide what to use for trim tile. We thought bullnose pieces might be best. Then, my mom and Tim suggested that we just stop with our regular tile since it had a sort of "finished" look to the edge; I didn't like this idea. Then, we finally find this rounded tile that was a great trim tile. We had planned to use it to finish off the edges of the backsplash, but realized it would be a perfect trim tile for the tub too. Unfortunately, it was expensive. :( All of our other tile purchases have been clearance tile from Home Depot. We love a bargain!
The wainscoting had to go in before the toilet since the wainscoting extended behind it. We also put the chair rail above the vanity for a seamless look. This meant everything on the vanity needed to be done, so that we were sure we weren't going to move it. Round 3 of tiling included a tile backsplash behind the vanity. More on that to come in a future post.
Now that the toilet is finally installed, this bathroom is sorta functional. My 7 months pregnant self didn't have to go downstairs in the middle of the night anymore. Wowza this bathroom was a big project! We've still got a few more posts to share.

.JPG)
Tim primed and painted all of the wainscoting and trim first.
.JPG)
Installation was pretty easy. We used an air compressor nail gun that Tim received as a Christmas present in 2011.
.JPG)
On the weekend that we began this project, we had a few helpers, Fergie (above) and Snoopy (below).
.JPG)
We had our usual helpers on hand to assist as well. Monkey and Fergie had to be in on the action.
.JPG)
Meanwhile, Sullivan was caught snoozing in bed.
.JPG)
They were all pretty paranoid of the loud noise made by the air compressor. They took to my side for protection.

I was actually able to help with this part of the project since it didn't involve any fumes or other hazardous activities.
.JPG)
But, I did leave the crawling around on the floor to Tim. At 6-7 months pregnant, lying on my belly to reach under the vanity wasn't really an option.

We had to install the vanity before we could install the wainscoting. This is because the top piece of trim extended behind the vanity. After much debate, we settled on this option since it would create a seamless look rather than abruptly stopping the top piece of trim.
You can also see our trim tile in this picture. We decided not to grout this because it would make a big huge mess. We thought we could use caulk instead. Tim headed to Home Depot to find something that would work. The Home Depot employee recommended this very thick caulk-like product. It was basically an all-purpose adhesive designed to be very strong (but it wasn't Gorilla Glue or anything like that). It worked perfectly! If I find the leftover, I'll let you know the name of the product.

After the vanity, came the wainscoting, then we were able to install the toilet. It's actually a pretty easy process. You place your wax seal then gently set the base of the toilet without jarring or moving the wax seal. This sounds easy, but it's pretty critical to a properly functioning toilet!
There are two bolts that hold the toilet in place. You set the bolts in the floor mount for the toilet. Then, you carefully place the toilet on the bolts while guiding the bolts into the holes on either side of the toilet. Sounds easy right? Not so. We tried several strategies with our first bathroom renovation. The bolts are pretty tall, but they wobbly when not secured by anything.
With our lower level bathroom, we tied strings to the bolts and strung them through the holes in the porcelain. I held the strings while Tim placed the toilet. That's a pretty tough challenge in a tight space. I read on another blog that you should use straws. Place the bolts in the floor mount, then put straws over the bolts, and guide the base of the toilet onto the straws. Lift the straws and voila your toilet is set.
The one additional piece of advice that I have-- you need to go grab yourself a couple of McDonald's straws for this task. Their straws are wide enough for the bolts to fit in. I had some skinny straws on hand that didn't work. Thankfully (?), Tim keeps a stash of miscellaneous items from drive thru meals such as straws, napkins, forks, etc. so he had a few to contribute to the cause.
After the base of the toilet is set, you can place the back, connect the plumbing, and you're done! Here's a good video on how to install a toilet in case you're curious.

So here's the one big wall of wainscoting. Ain't she pretty? Plus a crisp corner below. This picture captures a lot of the main items in the room.
.JPG)
We did some of the bathroom installation seemingly out of order. Thankfully, we were pretty logical and meticulous when we thought about what should come next so we didn't have to undo any of our work. Here's the rundown of events:
1) demo
2) tub
3) drywall
4) patch, spackle, sand everything
5) tile the tub surround and floor
6) paint the walls and trim
7) baseboard trim
8) vanity and sink, hook up the plumbing
9) trim tile (seems out of order, right?)
10) wainscoting and chair rail
11) toilet (again, out of order?)
12) medicine cabinet
13) tile some more (more tiling? why didn't we do it all at once?)
14) replace covers on the light fixture
15) replace door handles and hinges with brushed nickel
It was necessary to install the baseboard trim before the vanity because our vanity is raised on legs. You can see the space behind if you bend down. It was easier to put this in first. Tim then finished off the wainscoting by putting 6" tall pieces of wainscoting underneath. We're kind of perfectionists (or well, I am a perfectionist) and you could see from the side view (aka on the toilet or in the shower) that there wasn't wainscoting under the vanity if we skipped this step.
We tiled again (round 2) when we installed the trim tile. We wanted to paint the walls first, so that we didn't get paint on our new beautiful tile. Plus, it took us months to decide what to use for trim tile. We thought bullnose pieces might be best. Then, my mom and Tim suggested that we just stop with our regular tile since it had a sort of "finished" look to the edge; I didn't like this idea. Then, we finally find this rounded tile that was a great trim tile. We had planned to use it to finish off the edges of the backsplash, but realized it would be a perfect trim tile for the tub too. Unfortunately, it was expensive. :( All of our other tile purchases have been clearance tile from Home Depot. We love a bargain!
The wainscoting had to go in before the toilet since the wainscoting extended behind it. We also put the chair rail above the vanity for a seamless look. This meant everything on the vanity needed to be done, so that we were sure we weren't going to move it. Round 3 of tiling included a tile backsplash behind the vanity. More on that to come in a future post.
Now that the toilet is finally installed, this bathroom is sorta functional. My 7 months pregnant self didn't have to go downstairs in the middle of the night anymore. Wowza this bathroom was a big project! We've still got a few more posts to share.

Subscribe to:
Comments (Atom)